How to make great coffee with the AeroPress

Your AeroPress kit
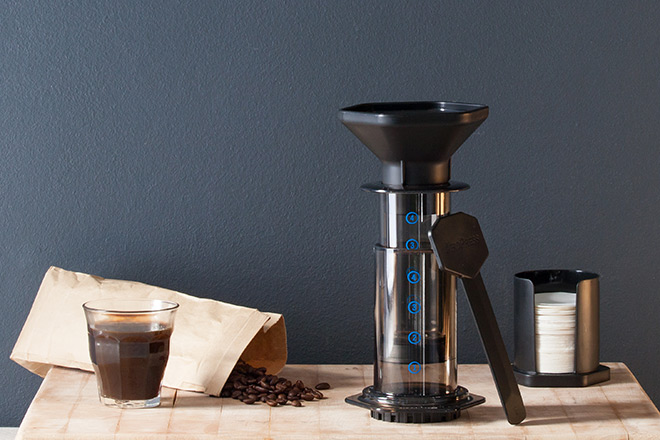
The gateway to hand-held, coffee-making freedom comes in a rather compact box and inside you’ll discover several components. To stop any head-scratching here’s a quick break down of what’s what.
Included in your AeroPress Coffee Maker is:
- a funnel
- a scoop for adding your preferred amount of grinds
- a stirring paddle for water and bean infusion
- a screw-on filter
- a container of filter papers
- the main coffee chamber
- the plunger
The traditional method
1. Remove the plunger (the one with the rubber stopper) from the coffee chamber.
2. Unscrew your filter cap from the bottom of the coffee chamber.
3. Pop in one of your filter papers (the experts recommend rinsing the filter paper with hot water to remove the paper taste) and screw the filter back onto the chamber.
4. If you’re making coffee for one, stand the chamber on a sturdy mug. If you’re intending to press out multiple espressos, rather press all the coffee into a decanting jug first so that the brew is equally strong throughout.
5. Put the desired amount of ground coffee into the chamber (two AeroPress scoops will make one double espresso, one Americano or one latte).
6. Pour the correlating amount of hot water (80ºC for optimum flavour as anything higher scalds the beans), into the brewing chamber (up to 1 for 1 espresso etc. for a double espresso and for 1 Americano pour up to mark 2).
7. Mix the grinds and water with your stirring paddle for about 10 seconds to assist in pre-infusion.
8. Now wet the rubber seal and insert the plunger into the chamber.
9. Apply gentle pressure to the plunger, guiding it down towards the grinds. It should take about 20–30 seconds to reach the bottom.

10. Once you’ve finished plunging, remove the entire chamber from your mug or decanter and screw off the filter part.
11. Now push the plunger all the way through until your coffee puck pops out on the other end.
12. Rinse out your AeroPress and store uncompressed to keep your rubber seal airtight for years. So either insert the plunger all the way into the chamber without the filter on or keep both components entirely separated.
13. Your filter can be rinsed off and reused, because we like being sustainable about it (reuse each paper filter up to 3 times or invest in a stainless steel filter). Leave the filter to dry before you take the next plunge.
As a side note, if you’re feeling particularly industrious, you can use the coffee grind to make a lovely body scrub or simply scatter them into your garden for extra vegetable oomph.
The inverted method
This method is said to be less messy because the chamber is upside down and there is no seepage through the filter. This method also expels more of the oils in the grinds, which contain ample flavour.
1. With this method you leave the filter screwed off at this point and instead insert the plunger into the chamber up to mark 4. Now turn it over so the bottom of the AeroPress where the filter would screw on is facing upwards.
2. Now add the desired amount of grinds into the chamber.
3. Pour in the water, 80ºC, up to the correct marking, so for a double espresso you would now pour up to mark 2. (Remember it’s upside down with the plunger at mark 4.)
4. Give it a good stir with your stirring paddle.

5. Now screw the filter compartment on with your paper filter inside. Don’t forget to rinse the paper with hot water to remove the papery taste.
6. With a decanting jug or your mug at the ready, turn the AeroPress over, give it a whirl, swirling the water a bit so that any grinds stuck to the top are re-introduced into the water.
7. Now place onto a decanter or mug and begin extracting your coffee by applying gentle pressure to the plunger. Listen for the final hiss. This is the last bit of water pushing through.
8. For a fast extraction, which we’re told holds a flavour advantage, push the plunger down harder.
More AeroPress tips:
– Many people complain that their coffee isn’t hot enough and proceed to kill any delicate aroma by nuking it in the microwave. Coffee is by nature a warm drink and not a hot drink but to keep your beverage warmer for longer, try preheating the chamber and your decanter with boiling water. Once the kettle starts to whistle, pour some water into your mug/decanter and coffee chamber. By the time you’re done swirling and rinsing out, your kettle water should be at 80ºC – perfect to make your own cup.
– True coffee appreciation is tainted by adding sugar, which usually just masks the bitterness. Did you know that if you heat your milk up to the ideal temperature of 72ºC, at which point the glucose breaks down, it should provide sufficient sweetness to your latte? Alternatively begin working your way down from your current sugar requirements until you get to the root of pure unsweetened caffeinated goodness.
Coffee lovers all over the world are waxing lyrical about the AeroPress so what’s all the fuss about? Head this way to find out more.