Mastering the art of jam with Tina Bester

With Tina Bester’s know-how, tasty homemade jam made with whatever fruit you have in abundance, is yours for the taking. We made gooseberry jam.

What you need:
1kg of fruit – the flavour of the jam is much better when the fruits you are using are really ripe, almost over ripe. 1kg fruit yields approximately 3 x 75ml jars.
Stone fruits make delicious jam and have a shorter season so they are ideal for preserving. Steer clear of fruits treated with pesticides – try to get the good stuff from farmer’s markets or a friend’s over bearing tree, like Tina Bester did with these golden gooseberries. If you have a fruit tree in your garden, you will be jam-packed for life, you lucky fish you.
800g-1kg of white sugar (you will need less sugar if you are using fruits with high pectin or you want less sweet results). White sugar produces a clear liquid, thereby producing a bright, untainted jam and is better at preserving the jam than its brown or treacle counterparts.

Tall pot – the jam mixture bubbles a lot so use a large pot to avoid a sticky mess. If you’re really keen on jam and make it often, consider a Maslin Pan.
Wooden spoon
Saucer
Ladle
Jam funnel
Jam jars
Jam strainer – if you like clear jam, without the pips, this will help but we didn’t strain this gooseberry goodness.
A little about pectin:
Pectin is a thickening agent, found in plant cells. It is produced commercially as a white powder which is derived and processed from citrus fruits to be used as a preservative. Sugar, like pectin is a preserving agent, so you really don’t need both in homemade jam. Fruits like gooseberries, apples, plums and pears are naturally high in pectin, so jams made from those require less sugar.
Pectin reduces cooking time when added to the jam mixture, therefore you get a greater yield from the chosen fruits because it’s not required to reduce with the sugar for as long. Tina’s advice? If you don’t really need it, don’t add it – keeping it simple is always best and more authentically homemade.
How to make jam:
1. Add your fruit, in this case gooseberries, and your sugar to a large pot and set on a low heat so that the sugar melts but doesn’t burn. You can also add a knob of butter to give your jam a nice gloss – this works well with apricot jam.

Keep stirring the fruit and sugar mixture so that the sugar doesn’t catch (when the sugar gathers and clumps along the bottom sides of the pot). Don’t worry about crushing your fruit, especially when using berries – they will split open from the heat, releasing all their seeds and juices as well as adding a nice texture to the jam.

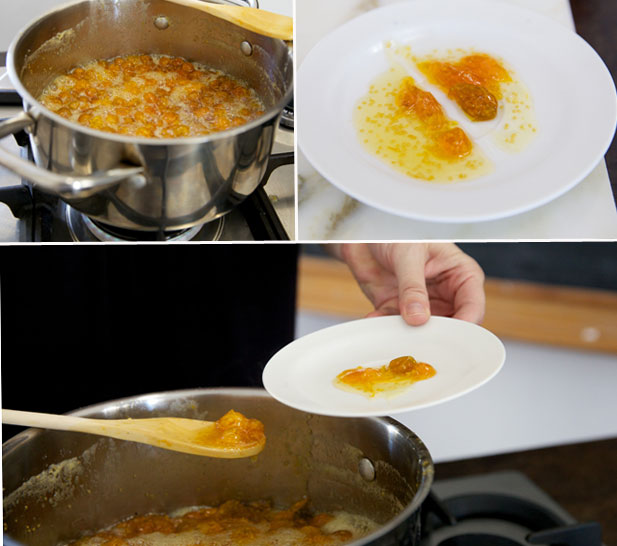
2. Keep an eye on the size of the bubbles forming. They start off as big bubbles and as the mixture reduces and combines, the bubbles decrease in size.
3. With a ladle, scoop off the frothy foam layer that begins to form on top of the bubbling sugar and fruit mixture. Once the bubbles around the jam have reduced to small bubbles, your jam is ready to be tested. This should take approximately 30 minutes. It will still look relatively runny in the pot but only because of the heat.

How to test if your jam is set:
You can use a jam thermometer to check if the jam is ready but if you don’t have one at hand, this simple setting test will do the trick.
- Place a saucer in the freezer so that it cools down quite quickly.
- After about 10 minutes, remove the saucer and scoop a tablespoon-sized dollop of jam onto it.
- Place it back into the fridge for another 5 minutes.
- Now remove the saucer and pull your finger through the centre of the jam pool. If your jam holds it’s shape and doesn’t all run into the road your finger has made, then it is set and ready to be bottled. Neat, hey? If it isn’t holding it’s shape, it will need a little more time on the stovetop.

4. Once your jam is set, you will need to put it into sterilised jars so as to be sure it will keep.
How to sterilise jam jars:
- Unscrew the lids from your jars and place them in boiling water for 10 minutes in a pot on the stove.
- Heat the oven to 180°C and place the glass jars in the oven for 10 minutes.
- Your jars are now ready to be filled.

5. Always add hot jam to hot jars, otherwise cold jam will crack the hot jars or vice versa. The jam bubbles slightly once placed into the jars – this is normal. If some of the jam runs down the sides of the jar while decanting, leave the jars to cool completely before wiping down or rinsing under the tap. Again, this could cause the jars to crack due to a sudden temperature difference.
Store your jam in the fridge (not the cupboard) and use it up within 6 months or give your homemade goodness away to a happy friend.

Inspired for a jam-making session? Head this way for another cracking recipe from Tina Bester – strawberry shortbread with strawberry and vanilla jam.
Tina Bester’s new book, Jampacked, is out now and it’s full of sweet inspiration.
A hearty and sticky thanks to Tina Bester for inviting us into her test kitchen and teaching us how to master the art of jam. Onwards, to fruit-laden trees we go.
